
What is it?
EW2 is a wireless device designed to enhance the capabilities of the ELDES alarm system, offering wireless connectivity to any third-party wired devices
What it does?
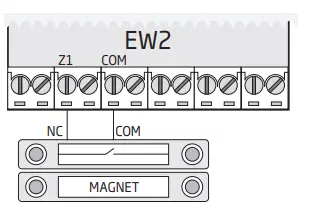
EW2 comes equipped with 4 zone terminals designed for wired digital sensor connection, such as magnetic door contact, motion detector etc.
In addition, the 2 open-collector outputs on board allow to connect any wired siren as well as to connect and control any electrical appliance, such as gates, lights, watering etc.
It is possible to connect up to 8 EW2 devices to Pitbull Alarm and Pitbull Alarm PRO, up to 16 EW2 devices to ESIM364, ESIM384 and ESIM484 -supports up to 32 EW2 devices at once.
The maximum wireless connection range is 150m (492.13ft) (in open areas).
Main features
- 4 zone terminals
- 2 open-collector outputs
- Compatible with any third-party wired sensor or siren
- 2 NTC/PT1000 temperature sensor terminals
Specifications
| Supply voltage | 7-15V 50mA max |
| Number of zones | 4 |
| Zone connection type | NC (normally-closed) |
| Number of PGM outputs | 2 |
| Maximum commuting PGM output values | 2 × 25V; 150 mA |
| Supported temperature sensor types | 10kΩ NTC; PT1000 |
| Wireless band | ISM868/ISM915 |
| Temperature sensor inputs | 2 |
| Range of operating temperatures | -20…+55 C (-4… 131°F) |
| Dimensions | 82×63×17mm (3.23×2.48×0.67in) |
FAQ
What nominal resistances are used when connecting the sensors to the EW2 module?
There is no need to use additional resistors when connecting the sensors. The device supports normally closed (NC) sensors:
I cannot add the device to security panel
If you are unable to pair the wireless device, please restore the
parameters of the wireless device to default and try again.
How to restore default parameters?
- Remove any battery from EW2 and/or disconnect the power supply.
- Press and hold the RESET button.
- Insert the battery back to EW2 and/or connect
the power supply. - Hold the RESET button until LED indicator
shortly flashes several times. - Release the RESET button.